Blog

  • How to Strengthen Weak Nails Naturally: A Simple Routine

    How to Strengthen Weak Nails Naturally: A Simple Routine

    I used to think that weak nails needed stronger polish or an expensive salon treatment. However, I eventually learned that brittle, peeling nails often improve when I reduce daily damage and follow a consistent care routine. Understanding how to strengthen weak nails naturally begins with protecting the existing nail plate while supporting healthier new growth through gentle care, moisture, and balanced nutrition.

    Natural nail improvement is rarely instant. Fingernails grow slowly, so damaged sections must gradually grow out before the entire nail looks healthier. The most effective approach is not a single homemade remedy but a combination of small habits practiced consistently.

    Understand Why Your Nails Feel Weak

    Weak nails may bend, peel in layers, split at the tips, or break before gaining length. Repeated exposure to water is one of the most common causes. Nails absorb water and expand, then contract as they dry. When this cycle occurs frequently, the layers of the nail plate can begin separating.

    Household detergents, cleaning sprays, hand sanitizer, acetone, and aggressive manicure removal can increase dryness. Gel, dip, and acrylic manicures may also leave nails thin when products are peeled or filed away forcefully.

    Nail biting, picking at polish, opening containers with fingernails, and cutting the cuticles can create additional trauma. Age, dry weather, indoor heating, and certain health conditions may also affect nail texture. Identifying the likely cause makes it easier to choose an effective routine.

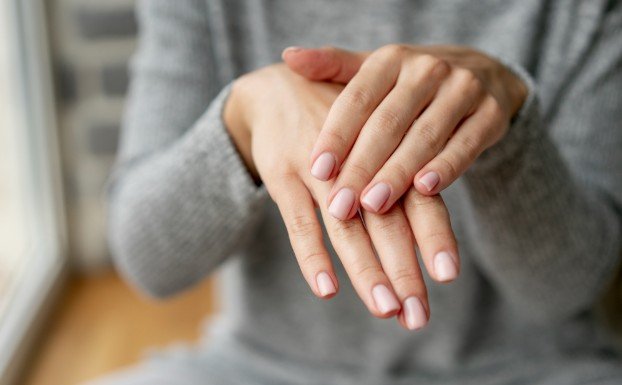
    Moisturize Your Nails After Washing

    Handwashing is essential, but frequent washing can remove natural oils from the nails and surrounding skin. I recommend applying a fragrance-free hand cream whenever the hands feel dry, especially after washing.

    Instead of stopping at the knuckles, massage the cream into each nail and cuticle. Ingredients such as glycerin, petrolatum, ceramides, urea, and hyaluronic acid help attract or retain moisture. A small amount of jojoba, coconut, sweet almond, or olive oil can then be applied over the moisturizer to reduce moisture loss.

    Oils can improve flexibility and help prevent dry nails from cracking, but they do not permanently change the internal structure of a nail. Their main value is conditioning and protection.

    Protect Your Hands From Water and Chemicals

    Protect Your Hands From Water and Chemicals

    Wearing gloves is one of the simplest ways to reduce nail damage. Use cotton-lined household gloves when washing dishes, cleaning bathrooms, gardening, or handling detergents. Gloves limit repeated soaking and reduce direct contact with irritating chemicals.

    Hands should not remain trapped inside sweaty gloves for long periods because excess moisture may irritate the skin. If the gloves become damp inside, remove them, dry the hands, and allow the gloves to dry before using them again.

    Use lukewarm rather than very hot water whenever possible. After washing, pat the hands dry instead of rubbing them aggressively, and follow with moisturizer.

    Keep Weak Nails Short and Smooth

    Long nails create more leverage when they catch on clothing, furniture, or other objects. Keeping fragile nails relatively short reduces bending and makes splitting less likely.

    Trim nails with clean, sharp clippers. Leave a small free edge rather than cutting into the sensitive skin. Smooth rough corners with a fine-grit glass or cushioned file. Gentle pressure matters more than filing quickly. Avoid digging deeply into the sides, where excessive filing can weaken the nail and irritate nearby skin.

    Never tear off a hangnail. Clip it carefully with clean nippers without cutting living skin. Pulling it can create an open wound and increase the chance of infection.

    Change Habits That Create Nail Damage

    Fingernails should not be used to open cans, scrape labels, loosen key rings, or pry apart objects. Use the pads of the fingers or an appropriate tool instead.

    Avoid biting the nails and picking the cuticles. Cuticles form a protective seal between the nail and surrounding skin. Cutting or pushing them aggressively can damage that barrier and allow bacteria or fungi to enter.

    If biting is difficult to stop, keep the nails short, identify situations that trigger the habit, and occupy the hands with another object. Bitter-tasting nail coatings may help some people, but behavior-based strategies are often more useful over time.

    Take a Smarter Break From Manicures

    Take a Smarter Break From Manicures

    Nails do not need to “breathe,” because the visible nail plate consists of dead keratin cells. However, a break from gel, dip, acrylic, or frequent polish removal can still be beneficial. It reduces chemical exposure and gives damaged sections time to grow out without additional filing, soaking, or peeling.

    Never peel off gel or dip products. Peeling can remove surface layers of the natural nail. Have the coating removed correctly or follow the manufacturer’s removal instructions.

    When using conventional polish, apply a base coat and remove it gently. Acetone works quickly but may be drying, especially with frequent use. A gentler remover can be appropriate for ordinary polish, although prolonged scrubbing should also be avoided.

    Support Nail Growth Through Food

    Nails are largely composed of keratin, a protein, so adequate dietary protein supports normal growth. Eggs, poultry, fish, dairy products, beans, lentils, tofu, nuts, and seeds can contribute protein as part of a varied diet.

    Iron, zinc, vitamin B12, and other nutrients also play roles in normal tissue growth. Deficiencies may contribute to nail changes, but taking large supplement doses without knowing whether a deficiency exists is not advisable.

    Biotin is often promoted as a nail-strengthening supplement. Limited studies suggest that it may help some people with brittle nails, but the evidence is not strong enough to treat it as a universal solution. High-dose biotin can interfere with certain laboratory tests, including some tests related to thyroid function and heart health. Consult a healthcare professional before using it.

    Be Careful With Popular Home Remedies

    Natural does not automatically mean effective or irritation-free. Lemon juice and apple cider vinegar are acidic and may sting cracked skin or worsen dryness. Baking soda can be abrasive, while raw garlic and essential oils can trigger irritation or allergic reactions.

    Rice water, gelatin soaks, and tea baths are popular online, but convincing evidence that they substantially strengthen the nail plate is lacking. Soaking weak nails may even increase water exposure.

    A simple moisturizer followed by a light oil is generally more practical than repeated acidic or abrasive treatments. Test any new topical ingredient on a small area first and stop using it if redness, itching, swelling, or burning develops.

    How Long Does Natural Nail Repair Take?

    How Long Does Natural Nail Repair Take

    A moisturizer may make nails feel more flexible within days, but lasting improvement requires patience. Fingernails generally need several months to grow from the base to the tip. A damaged area cannot truly heal like living skin; it must grow forward and be trimmed away.

    Take a photograph every four weeks under similar lighting. Comparing monthly images is more reliable than checking the nails every day.

    When to Consult a Healthcare Professional

    Seek professional advice when nail weakness appears suddenly, affects several nails, or continues despite careful home treatment. Pain, swelling, dark streaks, yellowing, lifting, deep grooves, unusual thickening, bleeding, or changes in the surrounding skin also deserve evaluation.

    Persistent nail changes can sometimes be associated with fungal infections, eczema, psoriasis, iron-deficiency anemia, or thyroid disorders. A clinician can identify the cause instead of relying on appearance alone.

    Frequently Asked Questions

    1. What is the best way to learn how to strengthen weak nails naturally?

    Begin by moisturizing after washing, wearing gloves during wet work, keeping the nails short, avoiding picking, and eating a balanced diet. Consistency is more important than trying numerous home remedies.

    2. Does coconut oil make nails stronger?

    Coconut oil can condition dry nails and cuticles, making them less likely to crack from dryness. It cannot repair an already split nail or correct an underlying nutritional or medical problem.

    3. Should I stop wearing nail polish completely?

    Not necessarily. Ordinary polish can be used carefully, but damaged nails may benefit from fewer manicures and gentler removal. Avoid peeling off polish, gel, dip, or acrylic products.

    4. Can weak nails become healthy again?

    Yes, when weakness is caused by dryness, repeated trauma, or damaging nail-care habits. Improvement occurs as healthier nail grows from the base and the damaged portion is gradually trimmed away.

    A Healthier Path Forward

    I have found that nail strength improves most when care becomes simple and repeatable. Moisturizing, protecting my hands, filing gently, and avoiding unnecessary trauma accomplish more than harsh hardeners or complicated kitchen remedies. With realistic expectations and steady care, I can protect the nail that is already visible while giving healthier growth the best possible start.

  • How to Prevent Nails From Breaking: 11 Practical Tips

    How to Prevent Nails From Breaking: 11 Practical Tips

    I know how frustrating it feels to grow my nails for weeks only to have one split while opening a container or reaching into a bag. Frequent breakage is not always caused by naturally weak nails. Repeated water exposure, dry skin, improper filing, harsh manicure removal, and everyday pressure can gradually weaken the nail plate.

    Learning how to prevent nails from breaking begins with identifying the type of damage and replacing harmful habits with a consistent care routine. Healthy nails need protection and moisture as well as strength. Nails that become excessively hard and inflexible may still snap under pressure.

    Understand Why Your Nails Keep Breaking

    Fingernails are formed from layers of keratin. When those layers lose moisture or become damaged, the free edge may peel, split, or snap. Nails that separate into thin layers are often affected by repeated wetting and drying. A nail that breaks cleanly across the tip may be too long, inflexible, or exposed to frequent physical pressure.

    Common triggers include washing dishes without gloves, using strong cleaning products, biting the nails, pulling hangnails, and using fingernails to open packages. Aggressive buffing can thin the nail plate, while peeling off gel polish can remove its upper layers.

    Cold weather, dry indoor air, frequent handwashing, swimming, and prolonged contact with water can make the problem worse. Persistent changes may sometimes be associated with a skin condition, infection, medication, or nutritional deficiency.

    Keep Your Nails at a Manageable Length

    Long nails experience greater leverage when they strike a hard surface. If my nails begin peeling or breaking repeatedly, I shorten them until the damaged portion grows out. This does not treat the underlying cause, but it reduces snagging and prevents small cracks from traveling farther down the nail.

    A short, softly rounded or squoval shape is generally practical. Sharp corners on square nails can catch on clothing, hair, and bags. I remove rough edges promptly instead of waiting for them to become larger splits.

    File the Edges Gently

    File the Edges Gently

    A coarse or damaged file can leave tiny irregularities along the free edge. I use a fine-grit or glass file and work gently from the outer edge toward the center. Excessive pressure and aggressive sawing can bend or fray delicate nails.

    Filing should refine the shape rather than remove large amounts of length. Nail clippers or sharp manicure scissors are more suitable for significant trimming. Filing nails while they are completely soaked and soft can also cause bending, so I allow them to dry first.

    Moisturize After Washing Your Hands

    Frequent handwashing removes oils from the nails and surrounding skin. Applying hand cream after washing helps replace moisture and keeps the nail plate more flexible. I work the product over my nails and around the cuticles rather than applying it only to my palms.

    At night, a thicker cream, ointment, or small amount of petroleum jelly can provide longer-lasting protection. Cuticle oil may also improve flexibility and reduce dryness, although it cannot permanently repair nail layers that have already separated.

    Limit Repeated Water Exposure

    Nails absorb water and expand, then contract as they dry. Repeated cycles can strain the bonds between their keratin layers and contribute to peeling, so limiting prolonged water exposure is an important step when trying to strengthen weak nails naturally.

    I wear lined rubber or nitrile gloves when washing dishes, cleaning bathrooms, or handling household chemicals. Gloves should not remain wet inside because trapped moisture can create another problem. After bathing or swimming, I dry my hands thoroughly and apply moisturizer.

    Stop Using Fingernails as Tools

    Opening cans, scraping labels, pressing stiff buttons, and separating key rings place concentrated pressure on the nail tip. These small actions can bend the free edge and create a crack that becomes visible later.

    I use a proper tool, the side of my finger, or my knuckle whenever possible. This single behavioral change can make a noticeable difference, especially when nails repeatedly break in the same place.

    Protect Your Cuticles and Hangnails

    Protect Your Cuticles and Hangnails

    The cuticle helps seal the space between the skin and nail plate. Cutting it aggressively, pushing it forcefully, or biting the surrounding skin may cause inflammation and increase the risk of infection.

    I never pull a hangnail because that can tear healthy skin. Instead, I wash my hands and trim the loose skin carefully with clean, sharp clippers. Moisturizing the surrounding skin regularly can reduce future cracking.

    Remove Nail Products Safely

    Regular polish, gel, acrylics, dip powder, and press-ons can cause damage when they are applied or removed incorrectly. Picking or peeling off a manicure can strip away superficial nail layers, leaving the surface thin and rough.

    I follow the correct removal method for the product and avoid scraping softened material forcefully. When my nails feel tender, thin, or visibly damaged, I keep them short and allow the affected area to grow out before applying another enhancement.

    Use Protective Coatings Carefully

    A base coat or suitable nail-strengthening product can reduce surface wear and provide temporary support. However, more hardness is not always better. Some hardeners may make already rigid nails less flexible and more likely to snap.

    I follow the label directions and stop using any product that causes irritation, extreme stiffness, or increased peeling. A coating should support the nail while good care habits address the source of the damage.

    Support Growth With Balanced Nutrition

    Nails require protein and micronutrients to grow normally. A balanced diet containing protein-rich foods, vegetables, whole grains, nuts, seeds, and other varied foods generally provides broader support than relying on a single “nail vitamin.”

    Biotin supplements are commonly marketed for brittle nails, but they are not a guaranteed solution for everyone. High doses can interfere with certain laboratory tests. Anyone considering biotin or another supplement should speak with a healthcare professional, particularly before blood testing.

    Frequently Asked Questions

    1. How to prevent nails from breaking when they are already short?

    Reduce water and chemical exposure, moisturize after washing, smooth every snag, and stop using the nail tips as tools. Short nails can still break when they are dry, peeling, or repeatedly bent.

    2. Does cuticle oil make nails stronger?

    Cuticle oil can improve moisture and flexibility around the nail, which may reduce dryness-related splitting. It cannot rebuild damaged nail tissue, so consistent protection is still necessary.

    3. How long does it take weak nails to improve?

    Improvement appears gradually as new nail grows from the base. Fingernails often require several months to grow from the cuticle to the tip, so damaged areas must grow out rather than heal instantly.

    4. Can gel manicures weaken natural nails?

    Gel itself is not the only concern. Rough preparation, over-filing, prolonged soaking, and peeling the product off can thin or damage the nail plate. Careful application and removal are essential.

    Final Thoughts

    I get better results when I treat nail care as a daily routine instead of searching for a one-time repair. Keeping my nails manageable, moisturizing consistently, wearing gloves, filing gently, and avoiding unnecessary pressure protects the new nail as it grows.

    Patience matters because existing splits cannot disappear overnight. By reducing repeated damage and watching for unusual changes, I can give my nails the best opportunity to grow smoother, more flexible, and less likely to break.

  • How to Introduce Chemical Peel Into Weekly Routine Safely

    How to Introduce Chemical Peel Into Weekly Routine Safely

    I burned my skin barrier five years ago by slathering a 30% AHA solution directly over wet skin while using prescription retinoids. My face looked glossy, red, and felt tight like plastic wrap for three weeks. Learning how to introduce chemical peel into weekly routine schedules requires clinical patience, deliberate acid selection, and aggressive recovery periods.

    Chemical exfoliation loosens the desmosomes holding dead cells together. When managed properly, it accelerates cell renewal, clears congested pores, and improves hyperpigmentation without mechanical micro-tears.

    Choosing Your Acid Class: Matching Molecules to Skin Physiology

    Choosing Your Acid Class: Matching Molecules to Skin Physiology

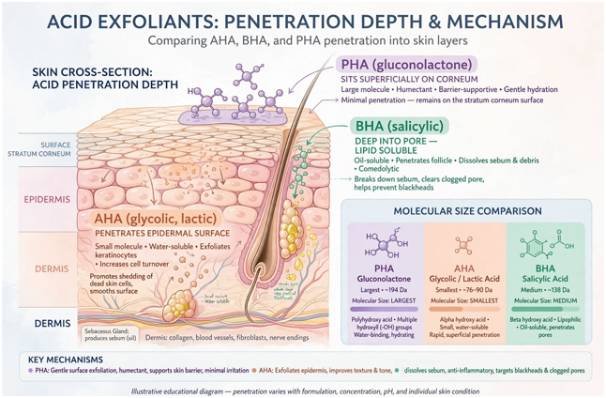
    Different acids work at different depths of the skin. Water-soluble Alpha Hydroxy Acids (AHAs) work on the stratum corneum, while lipid-soluble Beta Hydroxy Acids (BHAs) dissolve sebum deep inside follicular units. Polyhydroxy Acids (PHAs) feature larger molecular structures that sit safely on sensitive outer layers without causing deep stinging. Research documented by the American Academy of Dermatology highlights that matching acid formulations to skin barrier tolerance prevents post-inflammatory hyperpigmentation.

    +——————+———————–+————————+—————————————+

    | Acid Category    | Primary Types         | Penetration Depth      | Optimal Target Skin Profiles          |

    +——————+———————–+————————+—————————————+

    | AHA              | Glycolic, Lactic      | Epidermal (Surface)    | Sun-damaged, dry, texture irregularities |

    +——————+———————–+————————+—————————————+

    | BHA              | Salicylic             | Pores / Sebaceous units| Congested, oily, acne-prone           |

    +——————+———————–+————————+—————————————+

    | PHA              | Gluconolactone        | Superficial Corneum    | Reactive, rosacea-prone, compromised  |

    +——————+———————–+————————+—————————————+

    Glycolic acid has the smallest molecular weight of all AHAs. It penetrates quickly, making it effective for photoaging but risky for beginners. Lactic acid contains a larger molecular profile and natural humectant properties, making it an ideal starting point for combination skin. Salicylic acid cuts through lipid blockages, making it suitable for blackheads and inflammatory papules.

    The Application Protocol: Step-by-Step Night Execution

    Applying home peels requires following strict dermatological contact rules. Never deviate from manufacturer timing. Applying acids to damp skin accelerates absorption rates exponentially, drastically increasing the risk of chemical irritation. Peer-reviewed dermatological studies via the National Center for Biotechnology Information emphasize keeping your skin’s acid mantle near a physiological pH of 4.5 to 5.5 to support healthy epidermal repair.

    1. Purify Without Stripping: Wash with a mild, sulfate-free cleanser. Rinse thoroughly with lukewarm water. Hot water destabilizes surface lipids.
    2. Complete Dry-Down: Wait five full minutes after towel drying. The stratum corneum must be bone dry to prevent rapid acid pooling.
    3. Shield Sensitive Zones: Apply an occlusive ointment like petrolatum to the corners of your nose, oral commissures, and orbital eye bone rims.
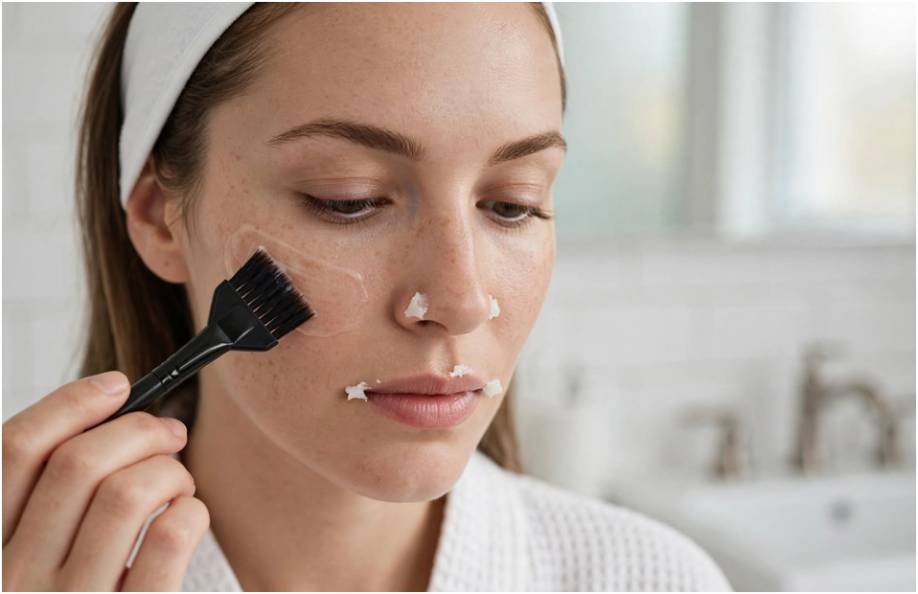
    4. Targeted Application: Spread the peel using a synthetic fan brush or pad, moving from forehead to cheeks and finishing on the chin. Avoid eyelids and lips entirely.
    5. Neutralize or Rinse: If using a wash-off treatment, rinse with cold water at the exact designated time mark. If leave-on, let it settle for ten minutes before proceeding.
    6. Support the Barrier: Apply lipid-rich creams containing physiological ratios of cholesterol and fatty acids. Understanding ceramides vs hyaluronic acid for skin hydration helps select moisturizers that physically rebuild damaged lipid architecture rather than temporarily pulling water to raw tissue.

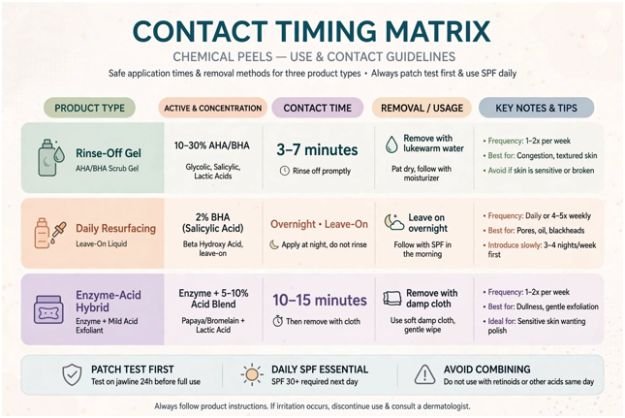
    The Contact Timing Matrix

    The Contact Timing Matrix

    +——————–+————————+———————+——————————-+

    | Formulation Style  | Active Strength Range  | Maximum Contact     | Post-Treatment Neutralization |

    +——————–+————————+———————+——————————-+

    | Rinse-off Gel      | 10% – 30% AHA/BHA      | 3 to 7 minutes      | Cold water wash + alkaline pad|

    +——————–+————————+———————+——————————-+

    | Daily Resurfacing  | 2% BHA / 5% Lactic     | Leave-on overnight  | None; moisturize directly     |

    +——————–+————————+———————+——————————-+

    | Enzyme-Acid Hybrid | 5% Fruit Enzyme + PHA  | 10 to 15 minutes    | Wet microfiber cloth removal  |

    +——————–+————————+———————+——————————-+

    The 28-Day Chemical Peel Rotation Schedule

    Never begin an acid regimen at full weekly frequency. Skin requires roughly 28 days to complete a natural cellular desquamation cycle. The “Sub-Erythema Micro-Dosing Strategy” spaces treatments to match this renewal rhythm. Start with an application every 14 days for the first month. Once the skin tolerates that without flaking, progress to a weekly schedule.

    +———–+———————————–+———————————–+

    | Weekday   | Morning Routine Focus             | Evening Routine Focus             |

    +———–+———————————–+———————————–+

    | Monday    | Gentle Rinse + SPF 50             | Low pH Cleanser + Hydrating Serum |

    +———–+———————————–+———————————–+

    | Tuesday   | Antioxidant Serum + Mineral SPF   | Gentle Wash + Chemical Peel Night |

    +———–+———————————–+———————————–+

    | Wednesday | Hydrating Mist + Ceramide Cream   | Barrier Repair Night (No Actives) |

    +———–+———————————–+———————————–+

    | Thursday  | Barrier Moisturizer + SPF 50      | Barrier Repair Night (No Actives) |

    +———–+———————————–+———————————–+

    | Friday    | Antioxidant Serum + Mineral SPF   | Retinoid Night OR Peptide Serum   |

    +———–+———————————–+———————————–+

    | Saturday  | Gentle Rinse + Hydrating SPF      | Soothing Sheet Mask + Squalane    |

    +———–+———————————–+———————————–+

    | Sunday    | Barrier Defense Lotion + SPF 50   | Rest Night + Rich Barrier Cream   |

    +———–+———————————–+———————————–+

    Balancing Actives and Recovery Nights

    Avoid using active ingredients concurrently on the same evening. Never layer vitamin C, prescription tretinoin, or physical scrub beads over a freshly peeled surface. Give your skin two full recovery evenings focused entirely on hydration after every peel session.

    The Skin Cancer Foundation confirms that chemical exfoliation increases photosensitivity to ultraviolet radiation by up to 50%. Broad-spectrum sunscreen with an SPF rating of 30 or higher is non-negotiable every single morning, rain or shine.

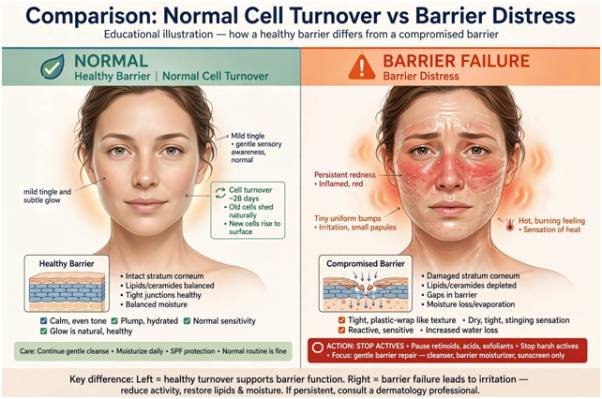
    Diagnosing Trouble: Barrier Distress vs. Normal Cell Turnover

    Diagnosing Trouble: Barrier Distress vs. Normal Cell Turnover

    Beginners often confuse cell turnover with irritant contact dermatitis. A mild tingle during application is normal; persistent throbbing, hot skin, or swelling signals chemical burns.

    Distinguishing between retinol purging vs allergic reaction breakouts is essential when assessing adverse reactions. Purging brings preexisting microcomedones to the surface in usual breakout zones. 

    Barrier failure manifests as raw, burning red plaques and tiny, uniform fluid-filled bumps across novel areas. If simple moisturizer stings upon application, halt all exfoliants immediately for three weeks and switch strictly to pure mineral sunscreen, gentle non-foaming cleansers, and occlusive balms.

    Frequently Asked Questions About Chemical Peels

    1. Can I leave my at-home chemical peel on overnight?

    Only leave the product on if the packaging specifically labels it as a leave-on serum; rinse-off peels left overnight cause severe chemical burns.

    2. How soon will I see visible results from a weekly peel?

    Surface radiance improves within 48 hours, while deeper textural improvements and dark spot fading take 8 to 12 weeks of consistent use.

    3. Should I peel if I have an active inflammatory acne breakout?

    Avoid using high-strength AHAs directly over open, bleeding, or inflamed cystic lesions; use a gentle, localized 2% salicylic acid wash instead.

    4. Can I wax or thread my face while using chemical peels?

    Discontinue all chemical peels at least seven days before waxing or threading to prevent epidermal skin lifting and scarring.

    Glow Hard, Peel Soft: Your Smooth Skin Action Plan

    Chemical peels are clinical skin tools, not casual beauty pampering sessions. Stop chasing immediate peeling sheets like those on viral videos; microscopically dissolved dead cells deliver smooth results without visible flaking or raw, sensitized redness. 

    Pick an acid matching your barrier profile, patch test on your jawline for 48 hours, apply on completely dry skin, and respect your recovery days. Consistency and moderation always beat aggressive over-treatment.

  • How to Treat Brittle Nails and Prevent Constant Breakage

    How to Treat Brittle Nails and Prevent Constant Breakage

    I find brittle nails especially frustrating because they can split just when they begin to look longer and healthier. They may peel into thin layers, crack along the edges, or snap during simple daily activities. 

    Although nail weakness sometimes points to an underlying health concern, everyday exposure to water, cleaning products, manicures, and dry air is often responsible. The best ways to treat brittle nails focus on restoring flexibility, preventing further damage, and protecting healthier growth from the base of the nail.

    Why Do Nails Become Brittle?

    Fingernails are made from compact layers of keratin. A healthy nail plate is firm but still flexible enough to tolerate ordinary pressure. When its layers become dry, thin, or poorly connected, the nail is more likely to peel, crack, or split.

    Repeated wetting and drying is a major trigger. Nails absorb water and expand when wet, then contract as they dry. Frequent handwashing, swimming, dishwashing, and cleaning can repeat this cycle many times each day. Over time, the bonds between the keratin layers may weaken.

    Dry weather, indoor heating, harsh soap, hand sanitizer, acetone remover, gel polish, and acrylic extensions can add further stress. Biting the nails, picking at polish, tearing hangnails, or using nails as tools also causes small injuries that eventually become visible cracks.

    Age can contribute because nails may grow more slowly and become drier over time. In some cases, persistent brittleness may be associated with iron deficiency, thyroid disease, psoriasis, eczema, fungal infection, or certain medications. Appearance alone cannot confirm the cause, so supplements should not replace a proper assessment.

    Best Ways to Treat Brittle Nails at Home

    Best Ways to Treat Brittle Nails at Home

    Moisturize the Nails Regularly

    Moisturizing is one of the simplest ways to improve nail flexibility. Apply a thick, fragrance-free cream after washing the hands and massage it into the nail plate, cuticles, and surrounding skin. Ingredients such as glycerin, petrolatum, lanolin, hyaluronic acid, or urea can attract water or help reduce moisture loss.

    A richer ointment can be applied before bed. Cotton gloves may help prevent it from rubbing off during sleep. Consistency matters more than applying a large amount occasionally. Moisturizing after every wash is particularly helpful for people whose hands are frequently exposed to water.

    Wear Gloves During Wet Work

    Protective gloves reduce direct contact with water, detergent, soil, and cleaning chemicals. Cotton-lined rubber or nitrile gloves are useful for washing dishes and household cleaning. Gardening gloves help prevent both chemical exposure and physical damage.

    Gloves should be dry inside before use. Wearing damp gloves for an extended period keeps the nails wet and may irritate the surrounding skin. Anyone who sweats heavily inside protective gloves can wear thin cotton liners and replace them when damp.

    Keep Weak Nails Short

    Short nails have less leverage, making them less likely to bend or catch on clothing. Trim damaged nails carefully and use a fine file to smooth rough edges before they develop into deeper splits.

    File gently rather than aggressively sawing back and forth. Never pull off a peeling layer, because the tear can extend into healthy nail material. A split that reaches the sensitive attached portion of the nail may become painful and vulnerable to infection.

    Limit Damaging Manicures

    Gel polish, acrylic extensions, strong adhesives, repeated buffing, and frequent polish removal can gradually thin the natural nail. Peeling off gel or acrylic material is especially damaging because layers of the nail plate may be removed with it.

    Allowing time between intensive manicures gives the damaged area an opportunity to grow out. Choose gentle removal methods and avoid prolonged exposure to acetone whenever possible. Traditional polish can still be used, but removing and reapplying it too frequently may worsen dryness.

    Cuticles should not be cut deeply. They form a protective seal that helps keep irritants and microorganisms away from the nail matrix. Gently pushing them back after bathing is safer than aggressive clipping and can help prevent nails from breaking by avoiding unnecessary trauma around the nail base.

    Use Nail Hardeners Cautiously

    A clear protective coating can reduce snagging and provide temporary support. However, excessive hardness is not the same as healthy strength. A nail that becomes too rigid may snap rather than bend under pressure.

    If a hardener causes burning, redness, peeling skin, or worsening brittleness, discontinue it. Nail products should support protective care rather than replace moisturizing and exposure control.

    Can Diet Improve Brittle Nails?

    Can Diet Improve Brittle Nails

    Nail growth depends on adequate nutrition, including protein, iron, zinc, and other vitamins and minerals. A varied diet containing protein-rich foods, vegetables, fruit, whole grains, nuts, seeds, and healthy fats generally provides better support than relying on a single “nail-strengthening” food.

    Biotin is frequently marketed for brittle nails, but evidence supporting routine supplementation remains limited. High-dose biotin can also interfere with certain laboratory tests, including tests related to thyroid function and heart health. It is sensible to discuss biotin with a healthcare professional and disclose its use before having blood tests.

    Iron supplements should only be taken when a deficiency has been identified. Unnecessary supplementation can cause side effects and will not repair nail damage caused by chemicals, trauma, or repeated water exposure.

    How Long Does It Take Brittle Nails to Recover?

    A damaged nail plate cannot be permanently repaired because it consists of nonliving keratin. Creams, oils, and coatings can improve flexibility or provide protection, but visible damage must gradually grow out.

    Fingernails commonly need several months to grow from the base to the tip. Improvement should therefore be measured over months rather than days. Taking a photograph every four weeks can make gradual changes easier to recognize.

    When Should Brittle Nails Be Checked?

    Seek professional advice if nail changes appear suddenly, affect several nails, or continue despite consistent protection and moisturizing. Evaluation is also appropriate when brittleness occurs with fatigue, hair loss, skin changes, unexplained weight changes, or other physical symptoms.

    Pain, swelling, pus, thickening, severe discoloration, bleeding, or separation from the nail bed requires attention. A new dark streak should also be evaluated instead of being treated as ordinary damage. A healthcare professional may examine the nails, test for infection, review medications, or recommend blood tests.

    Frequently Asked Questions

    1. What are the best ways to treat brittle nails?

    The best ways to treat brittle nails include moisturizing after washing, wearing gloves during wet work, keeping nails short, filing rough edges carefully, and taking breaks from damaging manicures. Persistent changes may require professional evaluation.

    2. Does petroleum jelly help brittle nails?

    Petroleum jelly reduces moisture loss and can improve flexibility when applied to the nail plate and cuticles. It cannot permanently join an existing split, but regular use may help protect new growth from dryness.

    3. Should brittle nails be buffed?

    Heavy buffing can thin an already weak nail plate. If smoothing is necessary, use a fine buffer lightly and infrequently. Filing a rough edge is usually safer than buffing the entire nail surface.

    4. Does drinking more water strengthen nails?

    Adequate hydration supports general health, but simply drinking more water may not correct brittle nails. External factors such as repeated handwashing, harsh chemicals, nail treatments, and loss of natural oils often matter more.

    A Healthier Path Forward

    I have learned that improving brittle nails requires patience rather than one instant remedy. I would focus on daily moisturizing, protection from wet work, gentle grooming, and fewer damaging manicures while healthier nail grow. 

    If the problem continued or appeared alongside unusual symptoms, I would arrange a professional assessment instead of guessing about deficiencies. Consistent protection gives new nails the strongest opportunity to grow with greater flexibility and fewer splits.

  • How to Layer Perfume With Body Lotion So the Scent Lasts

    How to Layer Perfume With Body Lotion So the Scent Lasts

    Perfume does not evaporate at the same rate on every person. A 2025 study of fragrance evaporation on volunteers found that skin hydration, transepidermal water loss, and surface roughness influenced how aroma molecules behaved, with hydration the strongest measured factor. 

    That makes how to layer perfume with body lotion more than a beauty trick: the condition of the skin can change how a scent develops. The practical rule is simple. Moisturize first, let the lotion settle, then spray perfume onto hydrated skin instead of dry skin.

    Why Lotion Changes the Way Perfume Wears

    Perfume contains volatile aromatic compounds. Lighter materials tend to create the first impression, while less volatile materials remain longer and shape the dry-down.

    Skin is not an inert surface. The NIH-hosted 2025 study found that hydration and water loss were associated with differences in fragrance evaporation, although the researchers said larger studies are needed. American Chemical Society research has likewise shown that fragrance performance depends on evaporation, skin interaction, and the physical properties of individual aroma chemicals.

    Moisturizer improves hydration and leaves emollient or occlusive ingredients on the skin. Dermatologists also recommend applying moisturizer shortly after bathing because it helps trap water. That hydrated surface can provide a different environment for perfume than dry, rough skin.

    Lotion will not magically double every fragrance’s wear time. Perfume concentration, climate, dose, clothing, and the composition of the fragrance still matter.

    The Best Order for Layering Lotion and Perfume

    The Best Order for Layering Lotion and Perfume

    1. Start after a shower. Pat your skin so it remains slightly damp. The American Academy of Dermatology recommends applying moisturizer while skin is still damp to reduce water loss. 
    2. Apply a thin layer of lotion. Cover the areas where you plan to wear fragrance, such as the neck, upper chest, wrists, and inner elbows. The goal is hydrated skin, not a greasy film.
    3. Wait one to two minutes. Let the lotion absorb until the surface feels soft rather than wet.
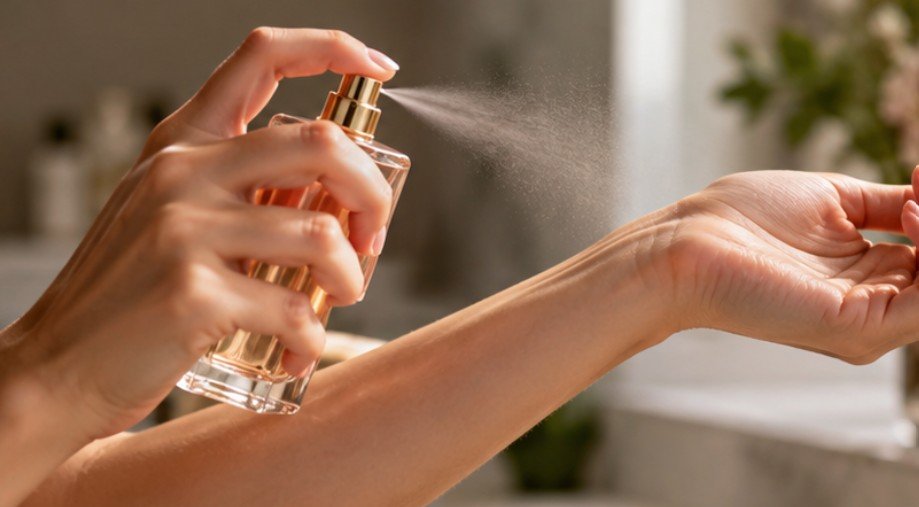
    4. Spray the perfume over the moisturized areas. Two or three sprays are usually enough for an everyday application. Hold the bottle several inches from the skin for a more even mist.
    5. Let it dry naturally. Avoid aggressively rubbing your wrists together. The common claim that rubbing literally destroys perfume molecules is overstated, but rubbing spreads the wet fragrance film and can change how quickly the opening disappears.

    For a softer scent trail, use a body or hair mist formulated for that purpose instead of repeatedly adding concentrated perfume.

    How to Pair Lotion and Perfume Without Creating a Scent Clash

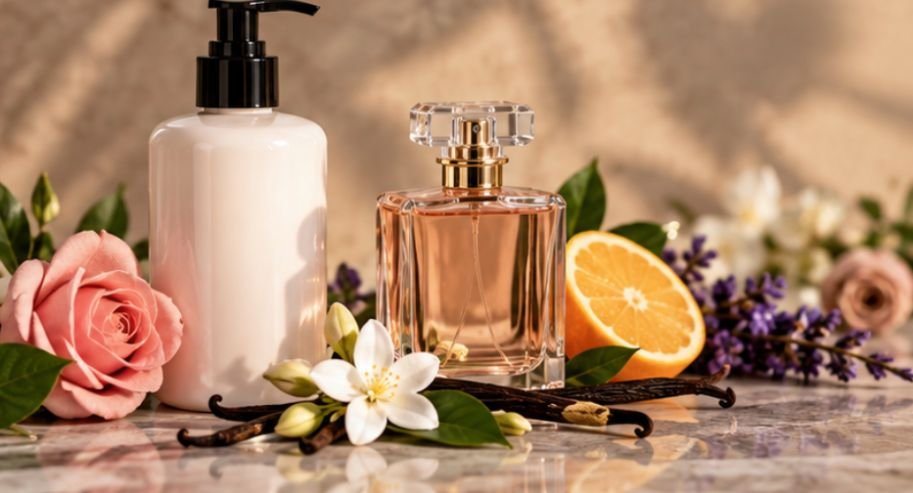
    Fragrance-free lotion is the easiest choice because it lets the perfume remain recognizable. Scented lotion can work beautifully when its notes support the perfume rather than compete with it.

    Perfume style Lotion pairing Expected effect
    Vanilla, amber, gourmand Vanilla, cocoa, almond, or fragrance-free Warmer, sweeter dry-down
    Citrus or fresh Aloe, green tea, soft citrus, or fragrance-free Brighter, cleaner profile
    Floral Soft musk, rose, peony, or fragrance-free Adds depth without much heaviness
    Woody or spicy Sandalwood, cedar, amber, or fragrance-free Reinforces warmth and dryness
    Complex niche fragrance Fragrance-free Preserves the perfumer’s intended balance

    Test unfamiliar pairings on separate areas of your arm and wait about 20 minutes. The opening can be misleading; the heart and base reveal whether the combination truly works.

    Is the SLO Method Worth Trying?

    The social-media “SLO” routine usually means serum, lotion, then oil before perfume. It creates several moisture-retaining layers and may be useful for very dry skin, especially during winter.

    More layers are not automatically better. A rich cream may already be enough, while extra oil can feel heavy and change projection. If you experiment with SLO, start with unscented serum and oil so you can judge whether the perfume itself lasts longer.

    Mistakes That Can Ruin an Otherwise Good Layering Routine

    Mistakes That Can Ruin an Otherwise Good Layering Routine

    The first is using several strongly scented products at once. A sweet coconut lotion, floral body oil, and green perfume may create an accidental fourth scent rather than a thoughtful blend.

    The second is applying perfume to irritated, freshly shaved, sunburned, or eczema-prone skin. The U.S. Food and Drug Administration notes that fragrance ingredients can trigger allergies or sensitivities in some people, and formulas may contain multiple materials that appear collectively as “fragrance” on a label.

    Just as using too many or incompatible products can affect fragrance layering, applying the wrong amount or texture of makeup can create similar issues, including how to stop concealer from creasing under eyes.

    The American Academy of Dermatology advises fragrance-free products for people with easily irritated or eczema-prone skin. Harvard Health also notes that perfume can contribute to contact dermatitis and, in some cases, photosensitive eruptions. If a fragrance causes persistent stinging, itching, swelling, or rash, stop using it. 

    How to Make the Layering Effect Last Longer

    How to Make the Layering Effect Last Longer

    If how to layer perfume with body lotion is your main goal, do not focus only on pulse points. A light spray on clothing can sometimes remain noticeable longer than fragrance on skin, but test an inconspicuous area first because perfume can mark silk and other delicate fabrics.

    Weather also changes performance. Heat tends to increase evaporation and projection, while cold conditions can make perfume seem quieter. During a hot U.S. summer, fewer sprays may be enough. In winter, moisturized skin becomes especially useful because indoor heating and cold outdoor air can leave skin dry.

    Reapply once later in the day if necessary rather than overspraying in the morning.

    If you want more consistent wear without adding too many sprays, these layering techniques can complement the broader tips on how to make perfume last longer on skin.

    Frequently Asked Questions

    1. Should body lotion go before or after perfume?

    Before. Apply lotion to slightly damp skin, let it absorb for about one to two minutes, then spray perfume over the moisturized areas.

    2. Can I use scented lotion with any perfume?

    Yes, but complementary notes are easier to balance. With a complex perfume, fragrance-free lotion is the safest choice if you want to preserve its original character.

    3. Does petroleum jelly make perfume last longer than lotion?

    It creates a more occlusive surface, so some people find fragrance lingers longer. Use a very small amount because it can feel greasy and may change how the scent projects.

    4. Is perfume-and-lotion layering safe for sensitive skin?

    Not always. If you have eczema, fragrance allergy, or reactive skin, favor fragrance-free moisturizer and limit scented products. Stop using anything that causes itching, burning, swelling, or rash.

    The Takeaway

    The best layering routine is deliberately simple: hydrate the skin, choose a compatible lotion, wait briefly, and use a controlled amount of perfume. Research now gives the moisturizer-first habit a reasonable scientific basis because skin hydration can influence fragrance evaporation. Start with fragrance-free lotion if you are unsure, then experiment with matching scent families once you know how your perfume behaves. 

    The goal is not to smell louder at every moment. It is to help the fragrance unfold cleanly, remain recognizable, and give you more consistent wear from the same bottle.

  • How to Treat Hormonal Acne Without Birth Control (My Real Protocol)

    How to Treat Hormonal Acne Without Birth Control (My Real Protocol)

    When cystic flares invaded my jawline in my mid-twenties, three separate clinicians handed me the exact same prescription: combination oral contraceptives. I refused. I wanted to balance my body, not mask symptoms with synthetic hormones that would inevitably cause a rebound surge the moment I stopped taking them.

    Learning how to treat hormonal acne without birth control required stripping away online marketing fads and leaning directly into dermatological endocrinology.

    You do not need oral contraceptives to get clear skin. By blocking androgen receptors directly, optimizing cell turnover, and curbing insulin-driven sebum production, you can resolve deep hormonal cysts at the source.

    The Biology: Why Your Jawline Is Inflamed

    Hormonal acne is not a hygiene failure. It stems from an inflammatory conversation between your endocrine system and your sebaceous glands.

    [Systemic Surge / Bloodstream]

    Androgens (Testosterone & DHT) + Insulin / IGF-1 Spikes

                           │

                           ▼

    [Target Site: The Pore]

    Binds to Sebaceous Gland Receptors

                           │

                           ▼

    Hyperkeratinization + Sebum Overproduction

                           │

                           ▼

    Clogged Follicle  ──►  Deep, Painful Cystic Flare

    During luteal phase shifts or periods of chronic stress, androgen levels spike or estrogen levels dip. This relative androgen excess signals your sebaceous glands to produce thick, sticky sebum.

    Androgen Sensitivity vs. Androgen Excess

    Most women battling adult hormonal acne actually have normal circulating testosterone levels on standard blood panels. The issue is rarely an overt endocrine tumor; it is localized receptor hypersensitivity. 

    Your pore lining converts free testosterone into dihydrotestosterone (DHT) via the enzyme 5-alpha reductase. DHT binds to your sebaceous receptors with roughly five times the affinity of standard testosterone, driving rapid sebum overproduction.

    If dead skin cells fail to shed properly, this excess oil pools beneath the surface. While surface congestion might require steps to get rid of closed comedones on forehead, hormonal eruptions run much deeper. They create hypoxic, inflamed microenvironments that turn into tender subcutaneous cysts.

    Medical Alternatives to the Pill That Actually Work

    Medical Alternatives to the Pill That Actually Work

    If you choose to bypass hormonal contraceptives, dermatologists rely on targeted therapies that halt androgenic activity without altering your systemic reproductive cycle.

    +——————+———————+———————–+

    | Feature          | Oral Spironolactone | Topical Winlevi       |

    +——————+———————+———————–+

    | Delivery Mode    | Daily oral tablet   | Twice-daily cream     |

    | Action Zone      | Systemic body-wide  | Localized to pores    |

    | Time to Results  | 8 to 12 weeks       | 10 to 12 weeks        |

    | Blood Pressure   | Slight decrease     | No impact             |

    | Eligible Sex     | Females only        | Males & Females (12+) |

    +——————+———————+———————–+

    Oral Spironolactone: The Internal Receptor Blocker

    Spironolactone is an oral aldosterone antagonist originally developed as a potassium-sparing diuretic. For adult female acne, dermatologists prescribe it off-label at low doses (typically 50 mg to 100 mg daily).

    Spironolactone binds competitively to androgen receptors in your sebaceous glands. When testosterone tries to signal your oil glands, spironolactone blocks the receptor site. According to the American Academy of Dermatology, spironolactone achieves significant clearance in up to 85% of adult women.

    Because it is a diuretic, you will urinate more frequently and need to hydrate consistently. Note that it is strictly contraindicated during pregnancy due to the risk of anti-androgenic effects on a male fetus.

    Topical Winlevi (Clascoterone): Localized Hormone Defense

    Topical Winlevi (Clascoterone): Localized Hormone Defense

    If you prefer to avoid oral prescription pills entirely, Winlevi (clascoterone 1% cream) represents the first major pharmacological breakthrough in decades. Published clinical data in the Journal of the American Academy of Dermatology confirms that clascoterone competes directly against DHT at the skin surface.

    The distinct advantage of Winlevi is its localized metabolism. Once the cream penetrates past the epidermis, tissue enzymes immediately break the active molecule down into cortexolone—an inactive, harmless metabolite. It will not alter your systemic blood pressure, flush out electrolytes, or disrupt your menstrual cycle. It gives you targeted hormonal control strictly where applied.

    Building an Anti-Androgenic Skincare Routine

    Topical products cannot alter your internal endocrine production, but they dictate how your skin cells respond to hormonal stress. Layering ingredients correctly prevents dead cells from sealing androgen-fueled oil inside your follicles. Structuring your morning vs night skincare routine steps order ensures your skin barrier stays resilient while handling high-potency actives.

    Active Topicals: Retinoids, Dapsone, and Azelaic Acid

    • Prescription Retinoids (Tretinoin, Tazarotene): Retinoids accelerate cellular turnover down inside the pore channel. Starting at 0.025% tretinoin two nights per week prevents microcomedones from hardening into inflammatory papules.
    • Topical Dapsone (Aczone 5% to 7.5%): Originally an antimicrobial, dapsone gel functions as an exceptionally gentle topical anti-inflammatory. It inhibits the neutrophil oxidative burst that turns minor pore blockages into red, swollen cysts.
    • Prescription Azelaic Acid (15% to 20%): A multi-functional dicarboxylic acid that mildly inhibits 5-alpha reductase, reduces redness, and dissolves post-inflammatory erythema (PIE) left behind by deep breakouts.

    Natural Anti-Androgens and Supplements: What Science Actually Supports

    The wellness industry promotes dozens of natural cures, but only a handful possess genuine clinical backing for hormonal breakouts.

          [Spearmint Tea]                     [Elemental Zinc]

                  │                                    │

       Reduces Free Testosterone             Inhibits 5-Alpha Reductase

          (~15-30% in Trials)                 & Reduces IL-6 / TNF-a

                  │                                    │

                  ▼                                    ▼

           Lowers Systemic                   Suppresses Follicular

         Hormonal Stimulation                     Inflammation

    Zinc, Spearmint Tea, and Why I Caution Against DIM

    • Spearmint Tea (Mentha spicata): Clinical trials cataloged on PubMed show that consuming two cups of organic spearmint tea daily significantly decreases free plasma testosterone in women with androgen excess. Phenolic compounds in the tea gently blunt androgen synthesis without pharmaceutical side effects.
    • Zinc Picolinate or Gluconate: Taking 30 mg of elemental zinc daily suppresses inflammatory cytokines (specifically TNF-alpha and IL-6) and exerts mild inhibitory activity against 5-alpha reductase. Always take zinc with a meal to avoid acute nausea.
    • The Problem with DIM (Diindolylmethane): Social media frequently claims DIM cures cystic acne by balancing estrogen metabolites. However, human clinical trial data for acne clearance is nonexistent. In clinical practice, unmonitored DIM supplementation frequently shifts estrogen pathways too aggressively, triggering headaches, irregular spotting, and severe paradoxical cystic breakouts. Skip the DIY hormone manipulation unless guided by an endocrinologist.

    Lifestyle Levers: Taming Cortisol and Insulin Surges

    Lifestyle Levers: Taming Cortisol and Insulin Surges

    Your dietary choices and stress markers interact directly with androgen pathways through an axis governed by Insulin-like Growth Factor 1 (IGF-1).

    1. Flatten the Blood Glucose Curve: Simple carbohydrates and high-glycemic foods cause acute insulin spikes. Elevated insulin drives the liver to produce IGF-1, which directly stimulates oil production in the pore and amplifies free testosterone. Prioritize protein, dietary fiber, and healthy fats at every meal.
    2. Buffer Adrenal Stress: Chronic psychological stress stimulates the hypothalamic-pituitary-adrenal (HPA) axis, dumping cortisol and dehydroepiandrosterone sulfate (DHEA-S) into circulation. DHEA-S is an adrenal androgen that sebaceous glands readily convert into pore-clogging DHT. Consistent sleep and somatic stress-relief protocols directly lower follicular oil output.

    VIDEO INSERT HERE

    Frequently Asked Questions

    1. Can spearmint tea cure cystic acne on its own?

    Spearmint tea modestly reduces circulating free testosterone, but it works best alongside topical retinoids rather than as a solo cure for severe cysts.

    2. How long does it take to clear hormonal acne naturally?

    Hormone receptor modulation requires three complete follicular turnover cycles, meaning visible clearance typically takes 8 to 12 weeks of consistent treatment.

    3. Is topical Winlevi safer than oral spironolactone?

    Yes, because Winlevi breaks down into an inactive metabolite upon absorption, avoiding the diuretic, blood pressure, and systemic hormonal effects of oral spironolactone.

    4. Does drinking dairy milk worsen hormonal breakouts?

    Yes, dairy contains natural bovine hormones and stimulates human IGF-1 production, which frequently exacerbates androgenic pore inflammation.

    Clear Skin Without the Co-Pay Compromise

    Ditching birth control does not condemn you to a lifetime of jawline cysts. True follicular clearance comes down to targeted biochemistry: intercepting androgens at the skin level with topical clascoterone or low-dose spironolactone, clearing dead debris with prescription retinoids, and keeping systemic insulin spikes flat.

    Pick one clinically validated pathway, give your skin barrier a full 90 days to adjust, and stop letting hormonal breakouts run your morning routine.

  • Time-Saving Beauty Tools for Everyday Use for a More Efficient Routine

    Time-Saving Beauty Tools for Everyday Use for a More Efficient Routine

    I used to think getting ready faster meant skipping something. On rushed mornings, I would choose between drying my hair properly, spending time on skincare, or doing enough makeup to look pulled together. After trying a few practical beauty tools, I noticed a different solution: the right device can remove steps instead of removing parts of the routine.

    I also realized that speed alone is not the real measure. A tool that takes five minutes but needs constant charging, cleaning, several attachments, and a complicated setup can slow me down overall. The useful ones fit naturally into the routine, perform more than one job, and are easy enough to grab when time is tight, and keep the whole routine moving without friction.

    What Makes a Beauty Tool Actually Time-Saving?

    A time-saving beauty tool should reduce the number of separate actions needed to reach the same result. A brush that dries and styles hair together can replace the dryer-and-round-brush routine. A multifunctional facial device can combine several skincare steps, while a simple eyelash curler can make a noticeable difference without adding another layer of makeup.

    Convenience also comes down to setup. Cordless operation, intuitive controls, quick heating, lightweight construction, and easy cleaning all matter. Current beauty-tool coverage is increasingly focused on compact multi-stylers, travel dryers, cooling devices, LED tools, and other gadgets designed around faster routines.

    Everyday Tools That Can Cut Down Your Routine

    Everyday Tools That Can Cut Down Your Routine

    Hair tools that combine steps

    A one-step dryer brush is a classic example. Instead of rough-drying your hair and then reaching for a separate brush, the tool handles both jobs together. The Revlon One-Step Volumizer is one familiar example of this category. It can be especially useful for medium-length or longer hair when the goal is a smooth, shaped finish without a full salon-style process.

    Small tools with a big payoff

    Not every useful tool needs a motor. Oversized claw clips can section thick hair while makeup or skincare is being done, keeping strands away from the face without requiring another styling step. An eyelash curler can create a lifted appearance in seconds, which can be useful on mornings when mascara or elaborate eye makeup feels like too much.

    Skincare devices for shorter routines

    Beauty technology can save time when it combines treatment steps or makes a short session easy to fit into a routine. LED masks, microcurrent devices, cooling tools, and facial massage devices are increasingly common examples. Current testing of skincare tools includes devices designed for sessions lasting only a few minutes, as well as multifunctional products intended to address several concerns.

    That does not mean every device belongs in an everyday routine. Red-light therapy, for example, requires consistent use, and dermatologists note that at-home devices are generally less powerful than professional equipment. Results can also vary, so the instructions and intended use matter more than impressive marketing language.

    Smart Features Can Make Beauty Routines Easier

    Smart features are most useful when they remove decisions. Automatic temperature adjustment, treatment timers, sensor-based controls, and guided settings can make a device easier to use consistently. A temperature sensor on a styling tool, for instance, can help manage heat while a timer on a skincare device can prevent guesswork.

    This is where newer beauty technology can be practical. The goal should not be to make a routine feel futuristic. It should make the routine more predictable. If a device remembers settings, signals when a session is finished, or adjusts output based on contact or temperature, those conveniences can add up.

    The same principle applies to smart beauty accessories. Beauty patches with smart sensors can fit into a technology-focused routine when the underlying purpose is clear, but consumers should still look closely at what the sensors actually measure and what the product can realistically deliver.

    How to Choose Tools That Save Time

    How to Choose Tools That Save Time

    Before buying another gadget, look at the routine rather than the feature list. Ask whether it replaces a step, combines two tasks, or creates another task. A device that saves minutes each morning but requires lengthy cleaning is not saving time. Check setup, charging, cleaning, and storage before buying.

    Make the Routine Smaller, Not Just Faster

    The best approach is to build a routine around tools that naturally disappear into everyday habits. A dryer brush can handle hair while skincare sets. A clip can keep hair back while makeup goes on. A quick facial tool can fit into a morning or evening step without requiring an entirely separate appointment with yourself.

    Portability can make that efficiency useful beyond home. Compact, rechargeable devices can reduce the number of products needed in a suitcase, gym bag, or overnight bag. Portable beauty tools for frequent travelers are particularly useful when a familiar routine has to fit into limited space, provided the tool works with the destination’s voltage and charging requirements.

    The Habits Worth Keeping

    Time-saving beauty tools work best when they simplify decisions as much as they shorten individual steps. The most valuable tool is rarely the one with the longest feature list. It is the one that gets used consistently, performs its job reliably, and removes friction from a routine you already have.

    A faster routine does not need to feel rushed. When the right tools handle repetitive work, the extra minutes can simply become yours again.

    FAQs: Time-Saving Beauty Tools for Everyday Use for a More Efficient Routine

    1. What beauty tool saves the most time?

    Multifunctional hair tools can make a noticeable difference because they combine drying and styling. They are especially useful when drying and styling are normally separate steps.

    2. Are smart beauty devices worth it?

    They can be useful when sensors, timers, or automatic settings genuinely reduce decisions or setup. They are most valuable when the controls make regular use simpler.

    3. Can facial tools replace skincare products?

    Usually, no. Many devices are designed to complement a skincare routine rather than replace cleansers, moisturizers, sunscreen, or targeted treatments. They may support a routine, but they generally do not replace its basic care.

    4. How should I choose a daily beauty tool?

    Start with the step that takes the most time. Choose a tool that reduces that step without adding complicated cleaning, charging, or maintenance. Consider how often you will use it and whether the result justifies its upkeep.

  • 10 Signs of Unhealthy Fingernails You Should Never Ignore

    10 Signs of Unhealthy Fingernails You Should Never Ignore

    I used to think nail changes were mainly cosmetic problems caused by polish, household chores, or dry weather. However, fingernails can also provide useful clues about local infections, skin conditions, injuries, and occasionally wider health concerns. Although one unusual mark rarely confirms an illness, a change that appears suddenly, affects several nails, causes pain, or refuses to grow out deserves closer attention.

    Healthy fingernails are generally smooth, firmly attached to the nail bed, and reasonably consistent in color and thickness. Fine vertical lines, minor variations in shape, and occasional white spots can be normal. The changes below are more important when they persist, worsen, or appear alongside other symptoms.

    Yellow or Unusually Discolored Nails

    Yellowing can develop after repeated use of dark nail polish, smoking, or contact with staining products. When the discoloration continues after the nail grows, however, a fungal infection may be responsible. An infected nail may also become thick, crumbly, distorted, or separated from the nail bed.

    Blue or purple nails may appear when the fingers are cold, but color that does not improve after warming can be associated with reduced oxygen circulation. Very pale nails may occur naturally, although persistent paleness across several nails can accompany anemia or other medical conditions.

    Brittle, Splitting, or Peeling Nails

    Frequent exposure to water can make nails repeatedly swell and shrink, weakening their layers. Cleaning products, acetone-based removers, aggressive filing, gel removal, and dry weather can make the problem worse.

    Brittleness can also occur with normal aging or conditions affecting the thyroid and skin. Iron deficiency is another possible factor, but brittle nails alone are not enough to diagnose a deficiency. If several nails become fragile without an obvious external cause, a clinician can determine whether testing is appropriate.

    If your nails are repeatedly splitting or becoming fragile, following practical ways to prevent nails from breaking can help reduce further damage and protect the nail as it grows.

    Deep Horizontal Grooves

    Deep Horizontal Grooves

    Vertical ridges running from the cuticle to the tip often become more visible with age and are usually harmless. Deep horizontal grooves are different. Known as Beau’s lines, they form when nail growth is temporarily interrupted.

    Illness with a high fever, major physical stress, injury, chemotherapy, uncontrolled diabetes, or severe nutritional problems can disrupt growth. Because fingernails grow slowly, the groove may become noticeable weeks after the triggering event. Grooves appearing across several nails at approximately the same level are more significant than an indentation on one injured nail.

    Tiny Pits Across the Nail Surface

    Nail pitting looks like clusters of small dents made by the tip of a pin. It can occur in people with psoriasis, eczema, or alopecia areata. The surrounding skin may show plaques, scaling, irritation, or hair loss, but nail changes sometimes appear first.

    One or two shallow dents may follow minor trauma. Numerous pits, repeated pitting, or changes affecting several nails should be assessed by a dermatologist, particularly when the nails are also thickening, crumbling, or lifting.

    Nails Lifting From the Nail Bed

    When part of a nail separates from the tissue underneath, the detached area often looks white or opaque. This condition is called onycholysis. It can result from an injury, an aggressive manicure, prolonged moisture, psoriasis, thyroid disease, sensitivity to nail products, or infection.

    Avoid digging beneath the lifted section because doing so can increase separation and introduce bacteria. Keep the nail short and dry. A clinician should examine persistent lifting, especially when it is accompanied by odor, debris, pain, or discoloration.

    Thickened or Crumbling Nails

    Thickened or Crumbling Nails

    A nail that becomes unusually thick, rough, or crumbly may have a fungal infection. Nail psoriasis can produce a similar appearance, which is why appearance alone cannot reliably identify the cause.

    Thickening may also develop after repeated injuries or pressure. Because treatment depends on the underlying problem, covering the nail with polish or repeatedly filing it down may hide the symptom without resolving it. Laboratory testing may be needed before antifungal treatment is recommended.

    Spoon-Shaped Fingernails

    Spoon nails are thin nails with raised edges and a depression in the center. The hollow may become deep enough to hold a drop of water. This change is known as koilonychia.

    It can be associated with iron-deficiency anemia, but exposure to chemicals, repeated trauma, and certain medical conditions are other possibilities. A naturally flat nail is not necessarily abnormal. A new spoon shape affecting multiple nails is a better reason to request a medical evaluation.

    Rounded Nails and Enlarged Fingertips

    Nail clubbing causes the fingertips to become enlarged while the nails curve downward around them. The change normally develops gradually and may affect both hands.

    Some people inherit this shape without having an illness. Newly developed clubbing, however, can be associated with conditions affecting the lungs, heart, digestive system, or liver. Because the possible causes require professional assessment, new clubbing should not be managed as a cosmetic concern.

    Red, Swollen, or Painful Nail Folds

    Red, Swollen, or Painful Nail Folds

    The skin around a nail may become tender, red, warm, or swollen when bacteria or fungi enter through a damaged cuticle. Nail biting, pulling hangnails, frequent hand washing, and cutting cuticles can increase the risk.

    Nail biting and pulling at damaged skin can make these problems worse, so following practical nail care tips for nail biters can help reduce repeated trauma and protect the surrounding tissue.

    A mild irritation may improve when the area is protected from moisture and further trauma. Pus, spreading redness, severe throbbing, fever, or worsening swelling needs prompt medical attention. People with diabetes or weakened immunity should seek advice earlier because infections can become more difficult to control.

    A New Dark Line Under One Nail

    A dark mark can result from a bruise, particularly after the finger has been trapped or struck. Bruising normally moves toward the tip as the nail grows.

    A new brown or black vertical band without a known injury should be evaluated, especially if it widens, has irregular colors, affects the nearby skin, or causes the nail to split or lift. Most dark nail marks are not cancer, but melanoma can occur beneath a nail and should be ruled out rather than self-diagnosed.

    How to Monitor a Suspicious Nail Change

    Remove polish so the entire nail and surrounding skin are visible. Photograph the area in natural light and note when the change first appeared. Watch whether discoloration moves outward with nail growth or remains fixed near the cuticle.

    Consider whether one nail or several nails are affected. A single abnormal nail often suggests local injury or infection, while similar changes across multiple nails can point toward a shared exposure, medication effect, skin disorder, or wider health issue.

    Frequently Asked Questions

    1. What are the most common signs of unhealthy fingernails?

    Persistent discoloration, splitting, peeling, deep horizontal grooves, numerous pits, thickening, lifting, swelling, clubbing, and unexplained dark bands are common warning signs. Their importance depends on how suddenly they appeared, how many nails are affected, and whether pain or other symptoms are present.

    2. Are vertical nail ridges unhealthy?

    Fine vertical ridges are common, especially with aging, and are usually harmless. Deep horizontal grooves, sudden surface changes, or ridges accompanied by discoloration and splitting deserve more attention.

    3. Do white spots mean I have a vitamin deficiency?

    Small white spots commonly result from minor trauma to the growing nail. They do not automatically indicate calcium deficiency. Widespread whitening or changes affecting many nails should be discussed with a healthcare professional.

    4. When should I see a dermatologist?

    Arrange an examination when a nail change persists, spreads, becomes painful, affects several nails, or has no obvious cause. Seek timely advice for a new dark streak, blue nails, pus, spreading redness, or newly developed clubbing.

    Final Thoughts

    I would not try to diagnose my overall health from one ridge, spot, or broken nail. I would instead pay attention to patterns: whether the change is new, whether it affects several nails, and whether it comes with pain, swelling, breathing problems, fatigue, or skin symptoms.

    Gentle care can help prevent everyday damage, but unexplained or persistent abnormalities require more than polish or a strengthening treatment. By watching how a change develops and seeking professional guidance when necessary, I can protect both my nails and the health concerns they may occasionally reveal.

  • How to Keep Your Nails Healthy Throughout Summer

    How to Keep Your Nails Healthy Throughout Summer

    Warm weather brings beach trips, swimming, gardening, travel, and more time outdoors, but these activities can be surprisingly demanding on the nails. Frequent contact with water can contribute to splitting, while sand, cleaning products, and everyday friction may weaken polished or natural nails.

    I adjust my nail routine when the temperature rises because the habits that work during cooler months are not always enough for an active summer. My most effective summer nail care tips focus on controlling moisture exposure, protecting the cuticles, maintaining a practical nail length, and treating polish gently. The routine does not need to be complicated, but it should be consistent.

    Understand What Summer Can Do to Your Nails

    Nails absorb small amounts of water and expand when wet. They contract again as they dry. When this cycle happens repeatedly through swimming, bathing, washing, or cleaning, the nail layers may begin to separate. This can result in peeling, splitting, and rough edges.

    Heat and outdoor activities can create additional problems. Sand may scratch polished surfaces, sunscreen can collect around the nail edges, and gardening may expose the hands to soil and physical damage. Closed shoes worn in hot weather can also trap sweat around the toenails.

    Rather than blaming one factor, consider the entire routine. A combination of water, friction, improper gel removal, dry cuticles, and neglected maintenance is often responsible for summer nail damage.

    Moisturize Nails and Cuticles Consistently

    Apply hand cream after washing and massage a small amount over the nails and surrounding skin. A thicker fragrance-free cream or petroleum jelly can be useful before bed, especially when the cuticles feel dry or rough.

    Cuticle oil can also help the nail area remain flexible. Apply it after swimming, after removing polish, or as part of an evening routine. Regular application is more useful than applying a large amount only when the skin has already cracked.

    Avoid cutting the cuticles. This thin layer of skin forms a protective barrier around the nail root. Cutting, biting, or aggressively pushing it back can create an opening for bacteria and increase the possibility of redness or infection.

    Protect Your Nails Before and After Swimming

    Protect Your Nails Before and After Swimming

    A fresh layer of clear top coat can provide additional protection for a polished manicure before a pool or beach visit. It will not make the manicure waterproof, but it may reduce minor surface wear and delay chipping.

    After swimming, rinse the hands and feet with fresh water. Dry carefully around and between the toes rather than leaving them damp. Apply moisturizer or cuticle oil once the skin is dry.

    As part of a nail care routine for winter, do not remain in wet socks or tight water shoes longer than necessary. Wear sandals in communal showers, pool changing areas, and other shared wet spaces. These simple measures help reduce exposure to organisms that can cause foot and nail infections.

    Choose a Practical Nail Length and Shape

    Long or sharply shaped nails are more likely to catch on towels, luggage, sports equipment, and swimwear. A shorter length with softly rounded corners is generally easier to manage during an active holiday.

    Trim fingernails with clean, sharp clippers and smooth snags with a fine nail file. Avoid forceful back-and-forth filing because it can leave already fragile edges rougher. Toenails should generally be trimmed straight across instead of deeply rounding the corners, which may encourage an ingrown nail.

    Never use a fingernail to open cans, scrape labels, or loosen objects. These small actions place pressure on the nail plate and may cause cracks or separation.

    Help Your Summer Manicure Last Longer

    Begin by removing oil and lotion from the nail surface before applying polish. Use thin coats and allow each one enough time to dry. Thick layers may remain soft underneath, leading to dents, wrinkles, or early peeling.

    Seal the free edge by lightly running polish and top coat across the nail tip. Reapply top coat as needed, particularly before travel or several days of swimming. Wear gloves while washing dishes, cleaning, or gardening because prolonged water exposure and household chemicals can shorten manicure wear.

    Never pull off lifting polish, gel, dip powder, or an artificial enhancement. Picking can remove superficial layers of the natural nail, leaving it thin and sensitive. Arrange safe removal or follow the appropriate soaking instructions for that specific system.

    Take Extra Care With Gel Manicures

    Take Extra Care With Gel Manicures

    Gel manicures can be convenient during holidays because they generally resist ordinary chipping, but they still require responsible application and removal. Apply broad-spectrum, water-resistant SPF 30 or higher to the backs of the hands before a UV-curing appointment. Dark, opaque fingerless gloves designed for manicure lamps are another option.

    If a gel coating begins to lift after swimming, do not glue it down or peel it away. Trapped moisture and continued picking can make the problem worse. Keep the area dry and have the coating removed or repaired correctly.

    After removal, moisturize the nails and surrounding skin. If the nails feel thin, sore, or unusually fragile, allow them time to grow without immediately applying another enhancement.

    Care for Toenails and Feet

    Open shoes make the feet more visible, but appearance should not replace basic health. Wash and dry the feet daily, moisturize rough heels, and choose footwear that does not press against the toenails.

    Avoid sharing nail files, clippers, footwear, or pedicure tools. When visiting a salon, look for clean workstations and properly disinfected instruments. Ask the technician not to cut the cuticles.

    People with diabetes, reduced sensation, or poor circulation should seek professional advice before treating nail injuries, calluses, or ingrown toenails at home.

    Recognize Problems That Need Attention

    Not every nail change is cosmetic. Pain, warmth, swelling, pus, persistent separation, or green, brown, or black discoloration should not be hidden beneath another layer of polish.

    Thick, crumbly, or increasingly distorted nails may require professional evaluation. Remove polish before an appointment when possible so the entire nail can be examined. Early assessment is more sensible than repeatedly covering a change that continues to worsen.

    Frequently Asked Questions

    1. What are the most important summer nail care tips?

    Limit prolonged water exposure, dry the hands and feet after swimming, moisturize the nails and cuticles, maintain a practical nail length, and avoid picking off gel or polish.

    2. Does swimming always damage a manicure?

    An occasional swim may not cause noticeable damage, but repeated soaking can contribute to lifting, chipping, and splitting. Rinsing, drying, moisturizing, and maintaining the top coat can help.

    3. Should nails be left unpolished during summer?

    Healthy nails do not need to be bare simply to “breathe.” However, a break from polish or enhancements may be helpful when the nails are peeling, painful, thin, or damaged.

    4. How often should cuticle oil be applied?

    It can be applied once or twice daily and after swimming or frequent handwashing. Consistent, small applications are usually easier to maintain.

    Final Thoughts

    I find that summer nail health improves when I concentrate on protection instead of constantly repairing visible damage. Drying my nails after swimming, moisturizing regularly, keeping the edges smooth, and resisting the urge to pick lifting polish make the greatest difference.

    A strong routine should support both appearance and nail health. With practical maintenance and attention to unusual changes, nails can remain neat, flexible, and comfortable through holidays, pool days, and everyday summer activities.

  • Best Nail Care Routine for Winter That Prevents Breakage

    Best Nail Care Routine for Winter That Prevents Breakage

    When colder weather arrives, I often notice my nails becoming dry before the rest of my hands feel uncomfortable. The tips begin peeling, my cuticles become rough, and polish chips sooner than expected. 

    I have learned that the best nail care routine for winter depends more on consistent protection than expensive treatments. Moisturizing after washing, wearing gloves, applying cuticle oil, and adjusting manicure habits can prevent much of the seasonal damage.

    Why Cold Weather Affects Nail Health

    Nails are formed from compact layers of keratin cells. A healthy nail plate contains enough moisture and natural lipids to remain firm but slightly flexible. Cold air, low humidity, and indoor heating encourage moisture to escape, making the plate harder and more likely to split.

    Frequent handwashing adds another challenge. Nails absorb water and expand while wet, then contract as they dry. Repeating this cycle throughout the day can weaken the bonds between nail layers. Hot water, harsh soap, cleaning chemicals, sanitizer, and strong polish remover may accelerate the damage.

    Winter also affects the cuticles. The cuticle seals the space between the skin and nail plate, helping protect new growth. When this area becomes dry or is aggressively trimmed, it can crack and produce painful hangnails.

    Begin the Morning With Moisture

    Wash your hands with lukewarm water and a gentle cleanser. Very hot water may feel comforting in cold weather, but it can strip protective oils from the skin around the nails.

    Pat the hands dry rather than rubbing them with a rough towel. Apply a rich hand cream while the skin is still slightly damp, working it over the nail plates, fingertips, and cuticles. Ingredients such as glycerin help attract moisture, while ingredients like ceramides, shea butter, squalane, and petrolatum help support the skin barrier and reduce water loss.

    Wear warm gloves when going outdoors. Choose a comfortable pair that does not place pressure on longer nails. If a nail is already cracked, trim and file it before putting on gloves so the damaged edge does not catch on the fabric.

    Protect Your Nails During the Day

    Protect Your Nails During the Day

    Reapply hand cream after washing whenever possible. Keeping a small tube beside the sink or in a bag makes this habit easier to maintain. When using sanitizer frequently, allow it to dry and then apply cream to reduce the tight, dry feeling it can leave behind.

    Wear waterproof gloves while washing dishes, cleaning, gardening, or handling household chemicals. Cotton-lined rubber gloves offer protection while helping control perspiration. Remove them if the lining becomes wet because trapped moisture can soften the nails and surrounding skin.

    Avoid using fingernails as tools. Opening cans, scraping labels, pressing stiff buttons, or pulling packaging can place excessive pressure on a dehydrated nail. Use an appropriate tool instead, particularly when the tips already feel brittle.

    Apply Cuticle Oil at Night

    Bedtime is an ideal opportunity to replace moisture lost during the day. Apply one drop of cuticle oil to each nail and massage it into the nail plate, cuticle area, sidewalls, and underneath the free edge.

    Jojoba, sunflower, squalane, avocado, and sweet almond oils are common options. Anyone with allergies should inspect the ingredient list carefully. The most effective oil is usually one that absorbs comfortably and is convenient enough to use every evening.

    For severely dry nails, layer a thick hand cream or plain petroleum ointment over the oil. Wearing cotton gloves overnight can help keep the treatment in place. This intensive method is useful for rough cuticles and recurring hangnails, but it should not be applied over swollen, painful, or potentially infected skin without professional guidance.

    Create a Gentle Weekly Nail Routine

    Once a week, remove any polish carefully and inspect the nails under good lighting. Check for cracks, peeling, unusual discoloration, soreness, or separation from the nail bed. Regular inspection prevents cosmetic products from concealing a developing problem.

    Use clean, sharp clippers to shorten the nails. Cut mostly straight across, then gently round the corners. Smooth rough edges with a fine-grit or glass file. Filing in controlled strokes places less stress on fragile tips than aggressive sawing movements.

    Avoid heavy buffing. It may temporarily make ridges or peeling areas look smoother, but it also removes part of the nail plate. Repeated buffing can leave already fragile nails thinner and more flexible.

    Finish the weekly routine with cuticle oil and hand cream. Keeping vulnerable nails relatively short reduces leverage and makes accidental breaks less likely while the damaged sections grow out.

    Change the Way You Apply and Remove Polish

    Change the Way You Apply and Remove Polish

    Regular nail polish can provide a temporary protective coating, but careless removal may cause more dryness. Apply a suitable base coat before color to reduce staining and create a smoother surface. Use thin layers and allow each coat sufficient drying time.

    Choose a non-acetone remover when practical, especially if the nails are already dry. Do not scrape off regular polish or peel away gel, acrylic, or other enhancements. Peeling can pull away layers of the natural nail and leave it thin, uneven, and sensitive.

    Apply cuticle oil after completing a manicure instead of immediately before painting. Oil left on the nail plate can prevent polish from adhering correctly. Healthy cuticles should be moisturized rather than cut. Only detached hangnails should be clipped carefully with clean tools.

    Adjust Care for Different Nail Problems

    Peeling nails benefit from shorter length, reduced water exposure, gentle filing, and regular oiling. Hard, brittle nails generally need more flexibility from oils and creams rather than repeated coats of powerful hardener.

    Soft nails should be protected from prolonged water exposure and harsh chemicals. A suitable strengthening base coat may provide temporary support, but excessively rigid formulas are not appropriate for every nail type.

    Nails damaged by gel or acrylic removal require patience. They cannot heal in the same way as living skin because the visible nail plate consists of dead keratin cells. The damaged section must gradually grow out. Keep nails short, moisturize them consistently, and avoid immediately covering severe damage with another enhancement.

    Know When to Seek Professional Help

    Seasonal dryness should improve when you protect nails from water damage and moisturize consistently. However, sudden or persistent changes should not automatically be blamed on cold weather.

    Seek professional guidance if a nail becomes painful, swollen, unusually thick, deeply grooved, detached, or significantly discolored. Dark streaks, bleeding, redness around the nail, or failure to grow also require attention. These symptoms may be connected to an injury, infection, skin condition, nutritional problem, or another health issue.

    Frequently Asked Questions

    1. What is the best nail care routine for winter?

    The best nail care routine for winter combines hand cream after every wash, nightly cuticle oil, gloves during wet work and cold weather, gentle weekly filing, and careful polish removal.

    2. How often should cuticle oil be used?

    Apply cuticle oil at least once daily, preferably before bed. Very dry nails may benefit from additional applications after handwashing.

    3. Should nails be left unpolished during winter?

    Nails do not need to breathe, but occasional polish-free periods make it easier to examine their condition and reduce exposure to remover.

    4. How quickly can dry winter nails improve?

    Cuticles may feel softer within several days. Damage within the nail plate takes longer because healthier nail material must grow from the base.

    Final Thoughts

    I have found that simple habits deliver better results than occasional intensive treatments. By connecting hand cream with washing, gloves with cleaning, and cuticle oil with bedtime, I can protect my nails without making the routine difficult.

    Consistency is what helps nails remain flexible, smooth, and comfortable throughout cold weather. When dryness continues despite careful treatment or unusual changes appear, I would seek professional advice instead of repeatedly hiding the issue beneath polish.